How to Invite Users With Invitation Codes in Authentik
By default, invitations in Authentik work by generating a unique invitation link that uses an invitation flow validated by a long token, such as:https://authentik.company/if/flow/invitation-enrollment-flow-internal/?itoken=2a77c53f-1632-41e7-ad35-58d3cfdac55c.
Instead of relying on these long URLs, I want to invite users using a simple invitation code. This would allow me to share a single invitation URL, while the code verification happens in the background. With this approach, I only need to share a link like https://authentik.company/if/flow/invite/ and provide the user with an invitation code.
Surprisingly, I wasn’t able to find a tutorial explaining how to implement this, so I decided to document the process here.
With this setup, you only need to provide users with the invitation flow URL (not the long default Authentik invitation link) along with a valid invitation code.
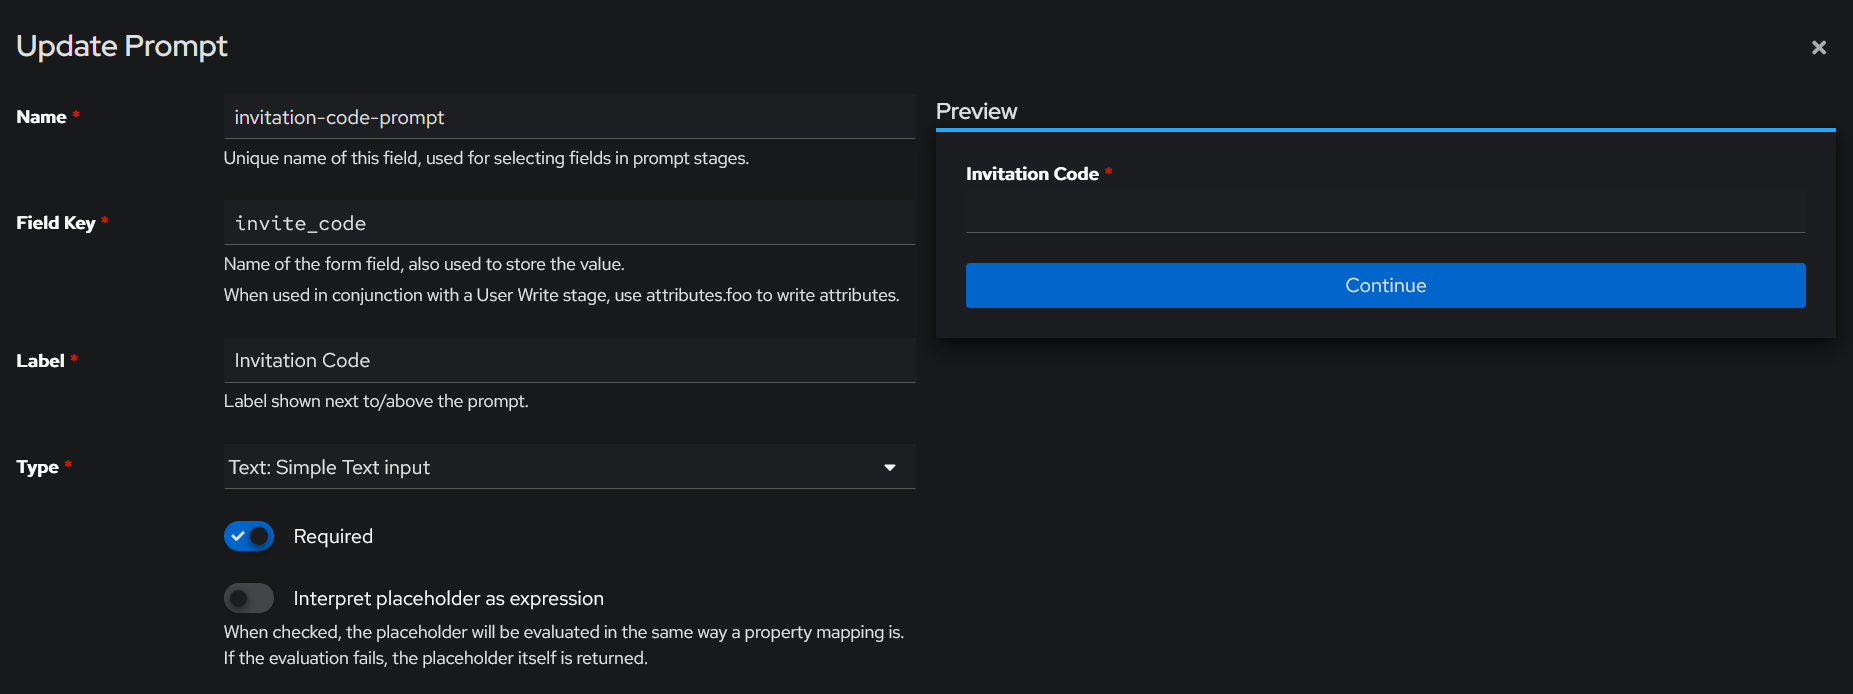
1. Create a New Code Prompt
- Go to Flow and Stages > Prompts > Create
- Fill the name with invitation-code-prompt
- Fill the field key with invite_code
- You can put whatever label you want
- Set the type to Test: Simple Text Input
- Toggle the Required button
You can change the fields value if you know what you are doing
2. (Optional) Create New User Creation Prompts
- Still in the Prompt page, click Create
- Create a new prompt for each Username, Email, Password, and Password (repeat)
- Make sure to fill the Order fields too
| Field | Username | Password | Password (repeat) | |
|---|---|---|---|---|
| Name | invitation-code-username | invitation-code-email | invitation-code-password | invitation-code-password-repeat |
| Field Key | username | password | password_repeat | |
| Label | Username | Password | Password (repeat) | |
| Type | Username... | Email... | Password... | Password... |
| Required | True | True | True | True |
| Order | 0 | 1 | 2 | 3 |
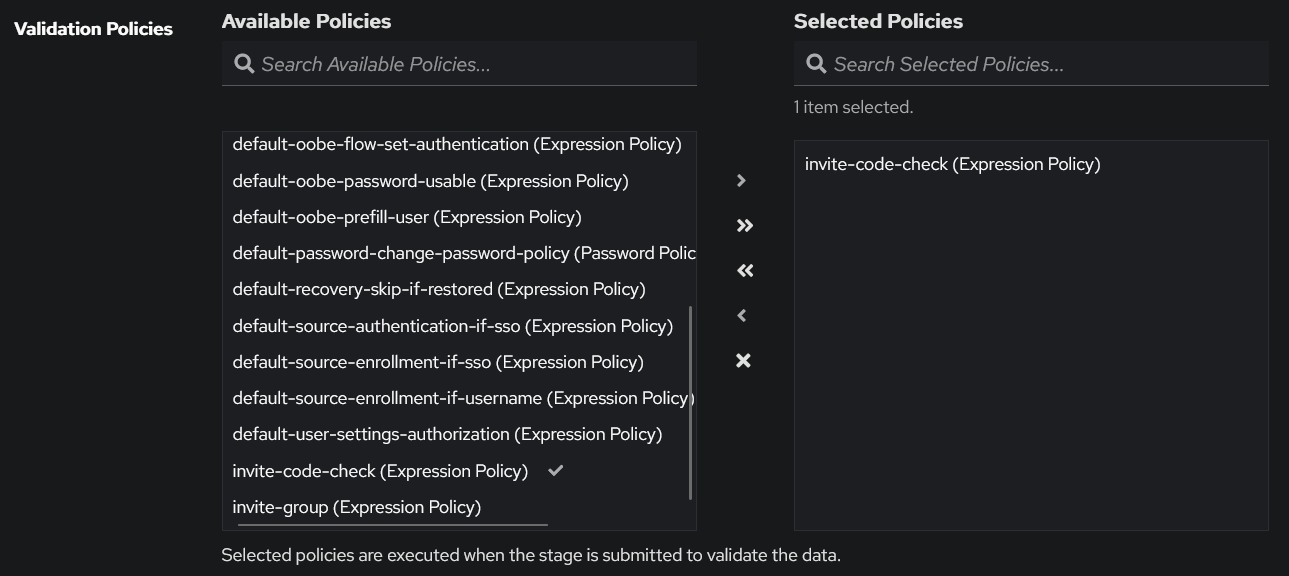
3. Create a New Invite Code Policy
- Go to Customization > Policies > Create
- Pick Expression Policy
- Fill the name with invite-code-check
- Fill the expression field with the code below, change the allowed dictionary with the invitation codes and their expiry date-time in line 8 and 9, you can have as many codes as you want
from datetime import datetime
from zoneinfo import ZoneInfo

code = (context.get("prompt_data", {}).get("invite_code") or "").strip().upper()

# Dictionary: CODE -> Expiry datetime string
allowed = {
  "TESCODEIFEXPIRE": "2025-12-31 23:59:59",
  "TESCODEFORTHISYEAR": "2026-12-31 23:59:59",
}

if code not in allowed:
  ak_message("Invalid invite code. Dude, are you sure you are invited? Check your code again.")
  return False

jakarta = ZoneInfo("Asia/Jakarta")

# Parse expiry time
expiry_str = allowed[code]
expiry = datetime.strptime(expiry_str, "%Y-%m-%d %H:%M:%S").replace(tzinfo=jakarta)

# Check expiration
now = datetime.now(jakarta)
if now > expiry:
  ak_message("This invite code has expired. You are too late, go get a new code.")
  return False

return True
You can change the code as you need. Don't forget to change the timezone also. As it is the user have to input an active case-sensitive code to pass the check.
You can also change the error messages in line 13 and 25.
4. Create a New Invite Code Stage
- Go to Flow and Stages > Stages > Create
- Pick Prompt Stage
- Fill the name with invite-code-stage
- Pass the invite-code-check policy to Selected Policies
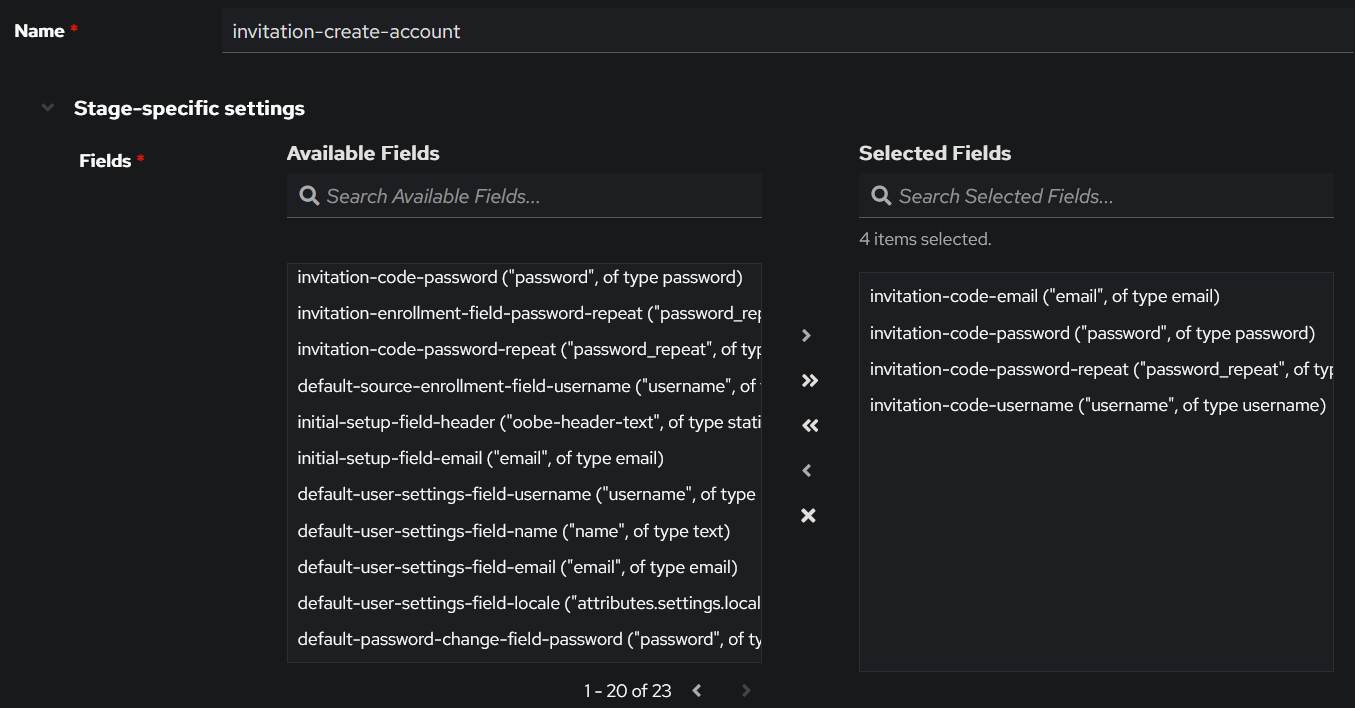
5. Create a New Account Creation Stage
- Go to Flow and Stages > Stages > Create
- Pick Prompt Stage
- Fill the name with invitation-create-account
- Pass all the newly created user creation prompts to the stage
6. (Optional) Create a New Write Stage and Login Stage
- For the write stage, the type is User Write Stage, mine is named invitation-enrollment-user-write-internal with the Always create new user toggled and account type internal
- For the login stage, the type is User Login Stage, mine is named invitation-enrollment-user-login
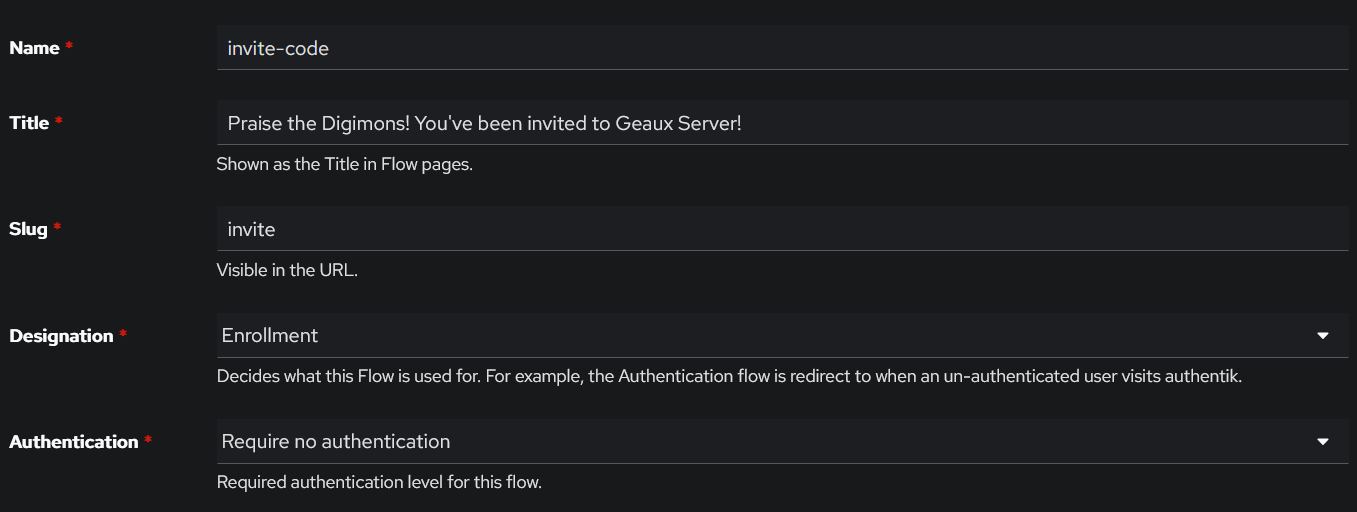
7. Create a New Invitation Flow
- Go to Flows and Stages > Flows > Create
- Fill the name and slug invite, that way you'll just have to share short link to your user e.g. http://authentik.company/if/flow/invite/ instead of long invitation string
- Pick the Enrollment designation
- Pick Require no authentication for authentication
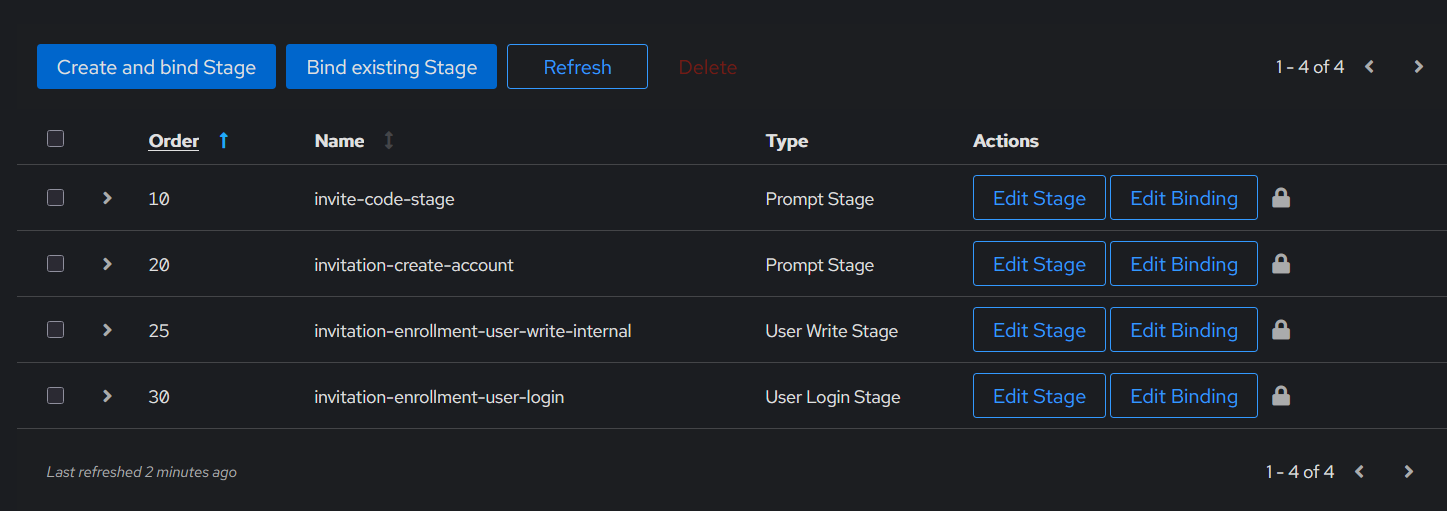
- Open the flow and go to the Stage Bindings tab
- Bind existing stage invite-code-stage and fill the order with 10
- Bind existing stage invitation-create-account and fill the order with 20
- Bind existing stage invite-code-stage and fill the order with 20
- Bind existing stage invitation-enrollment-user-write-internal and fill the order with 25
- Bind existing stage invitation-enrollment-user-login and fill the order with 30
- DONE!!
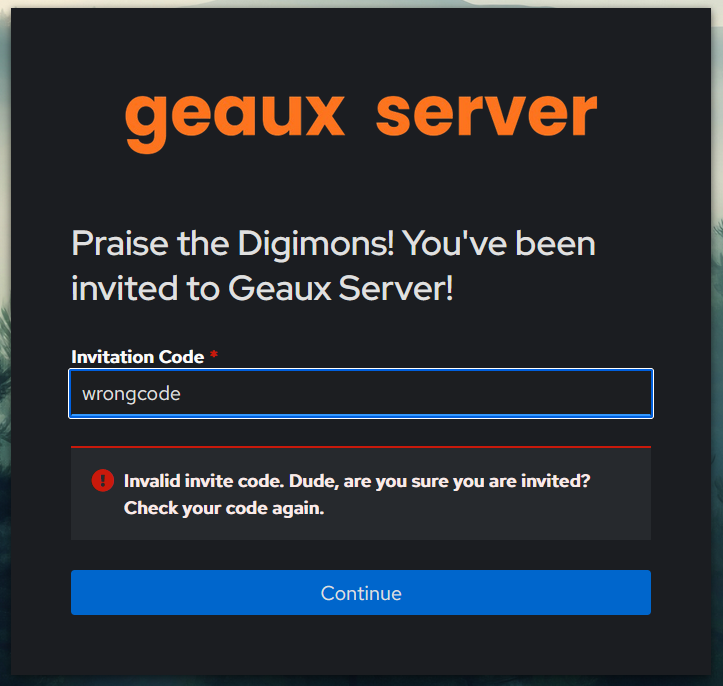
8. Testing Time!
Now you should be able to go to https://authentik.company/if/flow/invite/ or whatever slug you are using.
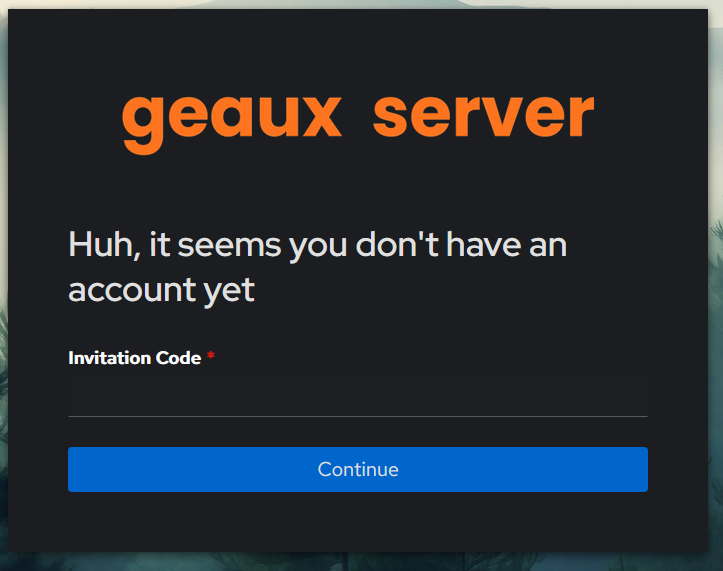
An invalid code will result in this
An expired code will result in this

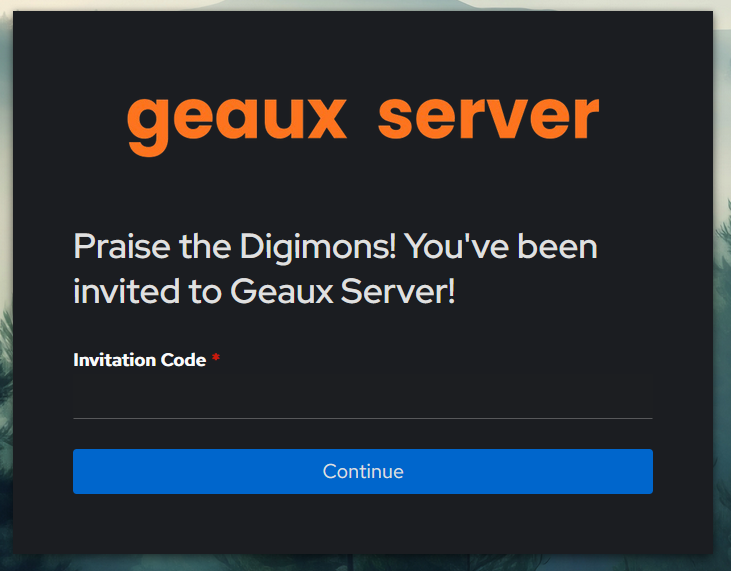
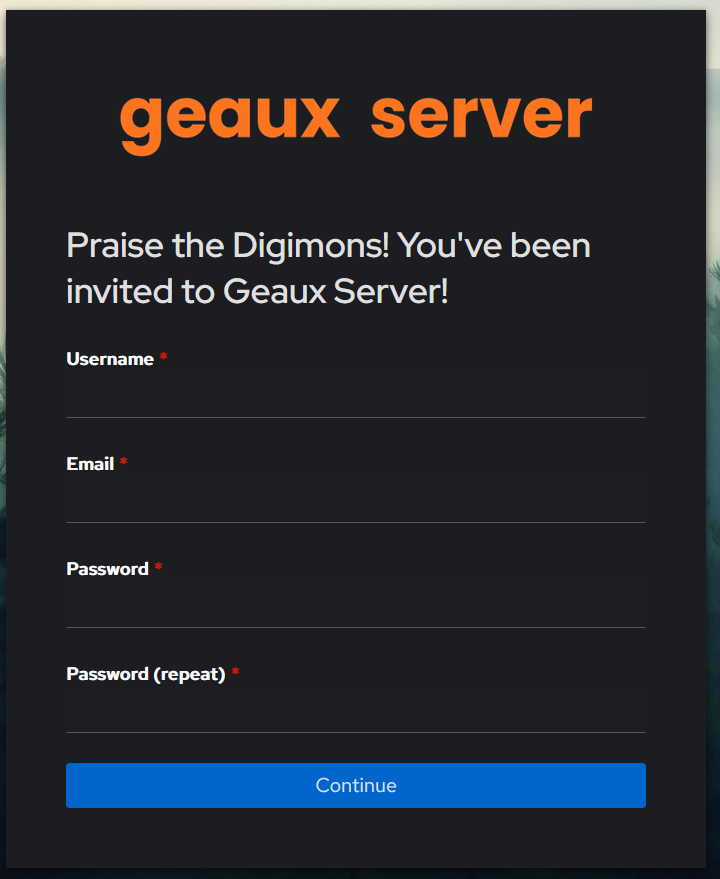
And a working code will forward user to account creation page
Bonus: Enforcing Invitation Codes for Automatic User Creation via SSO
By default, when a user authenticates using SSO, Authentik automatically creates a user account. Even if you configure an enrollment flow in the OAuth source, there is nothing preventing the account from being created.
With this flow, users are prompted to enter a valid invitation code before a user account is created.
-
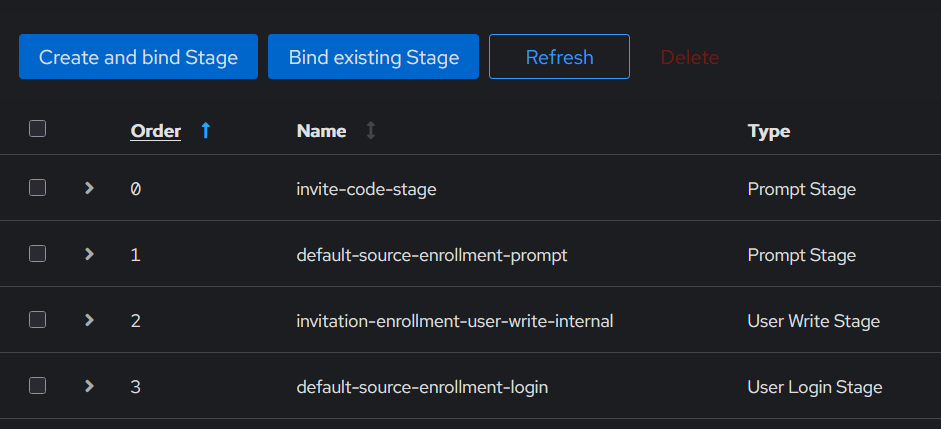
Create a new flow e.g. no-access-yet, then bind the invite-code-stage we created, default-source-enrollment-prompt stage, invitation-enrollment-user-write-internal stage, and default-source-enrollment-login stage with that order.
-
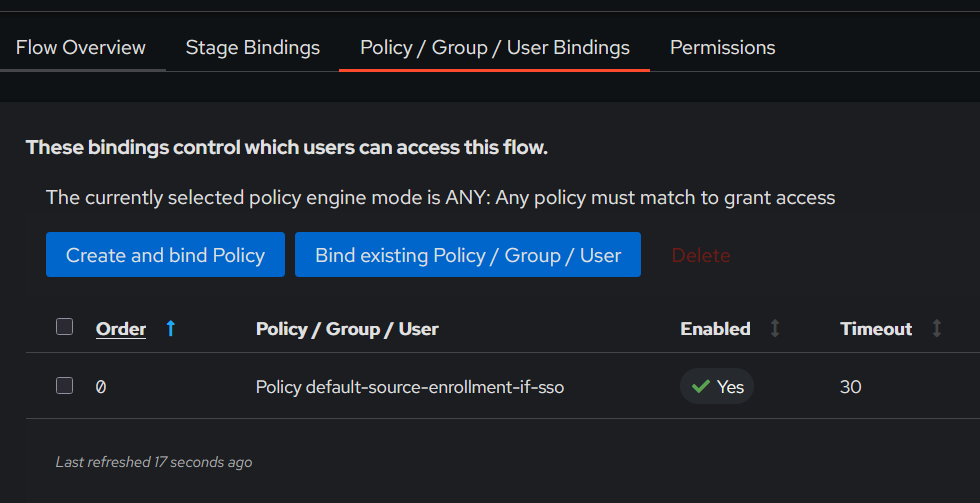
Bind the default-source-enrollment-if-sso policy
-
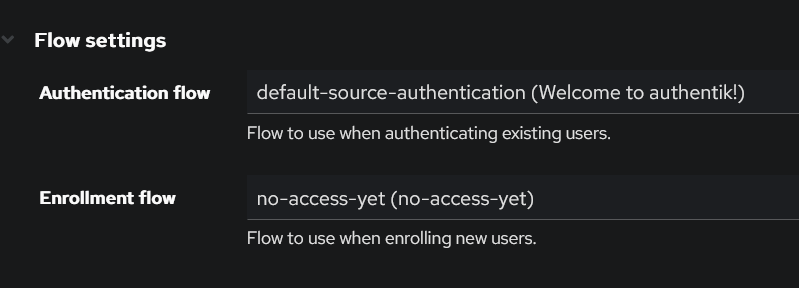
Go to the Federation and Social Login and use the no-access-yet as enrollment flow.
-
Now everytime an unregistered user tries to login with SSO, they will need to input a working invitation code also.